
Fax# (530) 621-1835
Phone# (530) 621-1840
AxCrypt Installation Guide
Posted in August 2013 by Technical StaffAs a requirement of Health Insurance Portability and Accountability Act of 1996 (HIPAA), all sensitive information must be protected when transmitting electronically. One form of protection for data being transmitted over the internet is encryption. While there are many different products and software packages available for encrypting data in compliance with HIPAA, one option is AxCrypt. AxCrypt is a free application which has been available for almost a decade and exceeds many commonly accepted encryption standards.
In this tutorial we will cover the installation of the AxCrypt Encryption/Decryption software. The entire process takes most users less than 2 minutes (depending on the system it is being installed on).
Downloads
- AxCrypt-1.7.x-Win32-en-US.msi (Required) --The AxCrypt software package, you will need to download this file to your computer.
- AxCrypt-1.7.x-x64-en-US.msi (Optional) --The 64bit version of the AxCrypt software. Use this version if the 32bit version does not work or if you know that you have a 64bit computer.
- AxCrypt-Installation-Guide.pdf (Optional) --This tutorial is available in PDF format for those users who feel the need to print this document.
Installation Steps
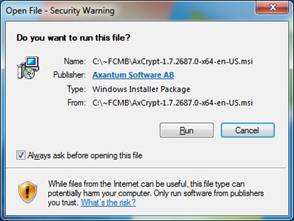 |
STEP #1) After downloading the AxCrypt install file to your computer, double click on it to begin the installation process. Depending on your version of Microsoft Windows, you may see an “Open File – Security Warning” window open. Go ahead and click “Run” if you see a window like this. |
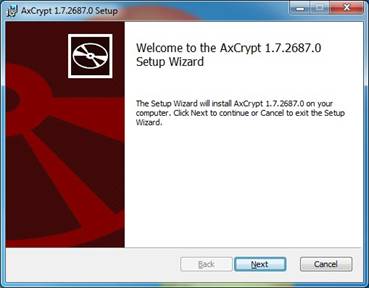 |
STEP #2) Click on “Next”. |
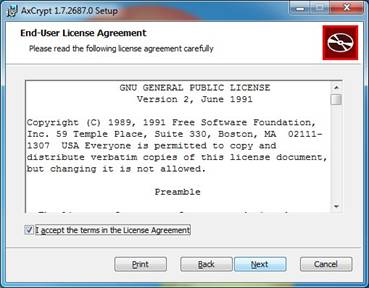 |
STEP #3) This is the license agreement for the program. It talks about what you can and cannot do with the program. The license for this program is very open and allows everyone to use it. Select “I Accept the terms in the License Agreement” if you agree to the terms of the licensing agreement. Now click “Next”. |
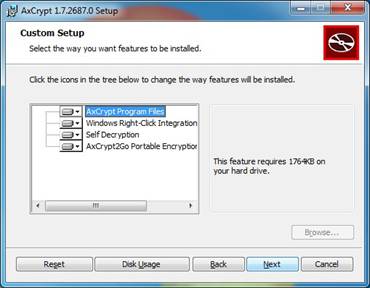 |
STEP #4) In this window, AxCrypt offers the ability to customize exactly what is installed. Generally we recommend just Clicking on “Next”. |
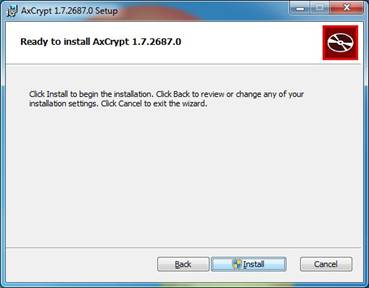 |
STEP #5) Once you click on “Install” the program will go through the installation process. The installation time will depend on your computers specifications. Note: Some users may get a window that opens during the installation process. If that happens just click on “Accept” or “Ok”. |
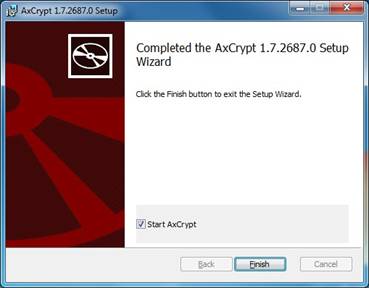 |
STEP #6) Now that the installation process is completed, click on “Finish”. |
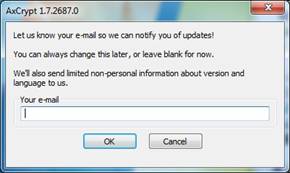 |
STEP #7) This last window that opens allows you to be notified of important updates. We generally recommend offices just leave the field blank and click on “Ok”; However, you can type in your own email address if you choose. If there is ever an important update we will notify all of our clients. |
In our text guide / tutorial we discuss using AxCrypt to Encrypt files with sensitive information.
Top Articles
- MNRP Maximum Non-Network...
Published in Aug. 2015 - AxCrypt Encryption Guide
Published in Aug. 2013 - AxCrypt Installation Guide
Published in Aug. 2013
Testimonials
- First Choice Medical Billing is by far the engine that allows EV Chiropractic to run. These people are not only incredibly gifted at what they do, but they have your back at all times the same way that best friends do.
- Dana has been a blessing to me with billing all my insurance patients. She stays current with the changes of insurance, and gives good sound advice on how to navigate through these changes. Her ethics are of high caliber and I appreciate her readiness to work with my small practice and get me paid. I recommend her to any and all of my colleagues.
